Hướng dẫn tạo và chạy project angular
{tocify} $title={Table of Content}
1. Download và cài đặt nodeJs
- Tải NodeJs, sau đó mở file đã tải và cài đặt theo hướng dẫn: Download NodeJs
-
Kiểm tra phiên bản:
node -vnpm -v
2. Cài đặt Yarn
    ==> Công cụ quản lý package javascript - cải tiến so sánh npm => package version trên các máy khác nhau lưu trong yarn.lock
    ==> Yarn luôn tạo và cập nhật yarn.lock => file yarn lock được đọc đầu tiên
    ==> Yarn cài đặt package (thực hiện task) song song --> tăng hiệu suất --> nhanh
- Download Yarn hoặc Yarn latest version
-
Sử dụng Yarn:
-
Thêm package:
yarn add [package] | yarn add [package] --devyarn add [package]@[version]yarn add [package]@[tag]
-
Nâng cấp package:
yarn upgrade [package]yarn upgrade [package]@[version]yarn upgrade [package]@[tag]
- Xóa package:
yarn remove [package] -
Cài đặt các package trong file package.json:
yarn install | yarn -
Yarn lock file
-
Mỗi khi cài đặt, nâng cấp hay xóa các package, yarn sẽ update file
yarn.lockđể theo dõi chính xác version của các package đã được cài đặt trong thư mụcnode_modules.
-
Mỗi khi cài đặt, nâng cấp hay xóa các package, yarn sẽ update file
-
Thêm package:
3. Cài đặt Angular CLI
- Run:
npm install -g @angular/cli - Install typescript:
npm install -g typescript - Kiểm tra version angular CLI:
ng -v | ng version -
Lưu ý: Nếu version angular CLI là version 9 và bạn đang dùng
Windows thì phải cài đặt thêm python hoặc windows-build-tools để có thể sử
dụng SCSS ở trong project sắp tới.
- Download and Install Python (check "Add Python 3.7 to PATH"): Python 3.7.4
4. Sử dụng Angular CLI trong project
-
Tạo project (Mặc định sẽ tạo qua npm):
ng new project-name-
ng new project-name --skip-git --skip-install --style=scss
-
Tạo project qua Yarn:
ng config -g cli.packageManager yarnng new project-name --style=scss --skip-git
-
Tạo project với routing
-
ng new project-name --style=scss --skip-git --routing - Tips: imports: [RouterModule.forRoot(routes, {useHash: true})] - Thêm dấu # vào route
-
-
Chạy project
ng serveng serve --port=9000 -o-
ng serve --host 0.0.0.0 --port 4201 --live-reload-port 49153 yarn start
-
Các lệnh tạo bằng Angular CLI:
-
Component:
ng g c component-nameng g c component-name --skipTestsng g component ten-component --spec false
- Module:
ng g module module-name --routing - Route:
ng g route my-route - Enum:
ng g enum my-new-enum - Interface:
ng g interface my-new-interface - Class:
ng g class my-new-class - Service:
ng g service my-new-service - Pipe:
ng g pipe my-new-pipe - Directive:
ng g directive my-new-directive
-
Component:
-
Build project
ng buildng build --prod | ng build --prod --aot=falseng build --dev
***** Install ESLint *****
Bạn nên thực hiện ngay sau khi tạo project, bởi vì TSLint đã không được dùng nữa kể từ năm 2019.
Nếu bạn dùng Angular v12 trở về sau, bạn chỉ cần chạy lệnh sau tại thư mục root của project:
- ng add @angular-eslint/schematics
Nếu bạn dùng Angular phiên bản cũ hơn, hoặc bạn có project đang chạy version cũ hơn, bạn hãy xem hướng dẫn tại Angular ESLint để migrate sang ESLint.
Changing the configurations
Chúng ta sẽ thêm một số config vào file .eslintrc.json 💨 overrides 💨 extends để ESLint hoạt động quả hơn:
"extends": [
        "plugin:@angular-eslint/recommended",
        "eslint:recommended", // Thêm một số rules cơ bản như check no unused variables
        "plugin:@typescript-eslint/recommended", // disables some conflicting rules from eslint:recommended
        "plugin:@typescript-eslint/recommended-requiring-type-checking", // adds some types rules
        "plugin:@angular-eslint/template/process-inline-templates"
],
Note: Bạn phải thêm theo đúng thứ tự code snippets ở trên.
Sau khi install và config ESLint, bạn thêm ESLint extension vào VSCode và chạy lệnh: yarn lint để test ESLint config.
Note: Nếu bạn muốn thay đổi các quy tắc cụ thể, bạn có thể thực hiện việc này tại "rules" trong .eslintrc.json.
"quotes": ["error", "single", { "allowTemplateLiterals": true }]***** Install Prettier *****
yarn add --dev prettier eslint-config-prettier eslint-plugin-prettierUpdate .eslintrc.json:
{
  "root": true,
  "ignorePatterns": [
    "projects/**/*"
  ],
  "overrides": [
    {
      "files": [
        "*.ts"
      ],
      "parserOptions": {
        "project": [
          "tsconfig.json"
        ],
        "createDefaultProgram": true
      },
      "extends": [
        "plugin:@angular-eslint/recommended",
        "plugin:@angular-eslint/template/process-inline-templates",
        "eslint:recommended",
        "plugin:@typescript-eslint/recommended",
        "plugin:@typescript-eslint/recommended-requiring-type-checking",
        "plugin:prettier/recommended"
      ],
      "rules": {
        "@angular-eslint/directive-selector": [
          "error",
          {
            "type": "attribute",
            "prefix": "app",
            "style": "camelCase"
          }
        ],
        "@angular-eslint/component-selector": [
          "error",
          {
            "type": "element",
            "prefix": "app",
            "style": "kebab-case"
          }
        ],
        "quotes": ["warn", "single", { "allowTemplateLiterals": true }],
        "prettier/prettier": ["warn", {"singleQuote": true, "parser": "flow"}, {
          "usePrettierrc": false
        }]
      }
    },
    {
      "files": [
        "*.html"
      ],
      "extends": [
        "plugin:@angular-eslint/template/recommended",
        "plugin:prettier/recommended"
      ],
      "rules": {}
    }
  ]
}
Tạo file .prettierrc.json tại root folder:
.prettier.json{
  "tabWidth": 2,
  "useTabs": true,
  "semi": true,
  "singleQuote": true,
  "quoteProps": "as-needed",
  "trailingComma": "none",
  "bracketSpacing": true,
  "arrowParens": "always",
  "overrides": [
    {
      "files": "*.component.html",
      "options": {
        "parser": "angular"
      }
    },
    {
      "files": "*.html",
      "options": {
        "parser": "html"
      }
    }
  ]
}
Chạy lệnh sau để apply prettier và format code và fix all errors:
ng lint --fix***** Setup husky and pre-commit hooks *****
Dùng để chạy check eslint trước khi commit, chặn các commit xấu:
yarn add --dev huskypackage.json"scripts": {
"ng": "ng",
"start": "ng serve",
"build": "ng build",
"watch": "ng build --watch --configuration development",
"test": "ng test",
"lint": "ng lint"
},
"husky": {
"hooks": {
"pre-commit": "yarn lint"
}
},yarn lint will always run when I try to commit a code.
5. Install Bootstrap
yarn add bootstrap-
Add
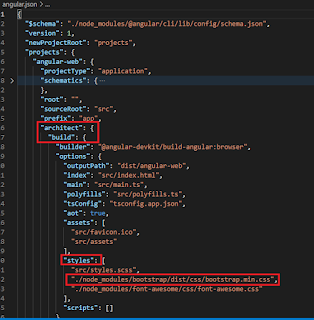
"./node_modules/bootstrap/dist/css/bootstrap.min.css"to architect -> build -> styles ofangular.json
6. Install Fontawesome
yarn add font-awesome-
Add
"./node_modules/font-awesome/css/font-awesome.css"to architect -> build -> styles ofangular.json
7. Initial Git
git initgit remote add origin remote-url
---- Install sort-import cho VSCode
Reference:
Tags:
angular


