Jenkins - Install and Configure Jenkins
1. Introduce
-
Jenkins là một server tự động hóa mã nguồn mở được viết bằng ngôn ngữ Java. Jenkins cho phép thực hiện việc tích hợp liên tục (CI- Continuous Integration) và triển khai liên tục trong phát triển phần mềm (build, test, deploy…).
Example:
- 1 project được phát triển bởi nhiều developer, mỗi developer lại viết code trên một môi trường khác nhau. Sau khi viết code, tất cả các developer đều sẽ commit code nên một source chung (Git, SVN…). Jenkins sẽ thực hiện pull source code đó về, tự động build, test và deploy lên các môi trường cho tester thực hiện test. Nếu không có lỗi thì sẽ deploy lên môi trường product. Hoặc nếu quá trình build, test bị failed (do lỗi code, do môi trường, …) thì sẽ thông báo cho developer để sửa.
- Tiền thân của Jenkins là Hudson được viết bởi Kosuke Kawaguchi tại Sun, kể từ khi Sun được mua lại bởi Oracle vào năm 2010 (Jenkins được forked từ Hudson sau đó), một bộ phận phát triển Hudson đã tách ra phát triển riêng và được đặt tên là Jenkins.
-
Lợi ích của Jenkins:
- Giảm thiểu rủi ro do lỗi được phát hiện sớm.
- Một quy trình kiểm tra tự động (Automated Testing)
-
CI/CD:
- CI (Continuous Integration): Tích hợp liên tục, tức là sau code được commit sẽ được tự động pull về, build, test
- CD (Continuous Delivery): Chuyển giao liên tục, tức là code sau khi build sẽ được tự động test, deploy lên các môi trường
2. Install Jenkins on Linux
On Ubuntu with apt-get
Install JDK
$ sudo apt-get install openjdk-8-jdk
Add the repository key to the system
$ wget -q -O - https://pkg.jenkins.io/debian-stable/jenkins.io.key | sudo apt-key add -
Append the Debian package repository address to the server’s
sources.list
$ sudo sh -c 'echo deb http://pkg.jenkins.io/debian-stable binary/ > /etc/apt/sources.list.d/jenkins.list'
Run
update so that apt-get will use the new
repository
$ sudo apt-get update
Install Jenkins and its dependencies
$ sudo apt-get install jenkins
Notes: This package installation will:
-
Setup Jenkins as a daemon launched on start. See
/etc/init.d/jenkins(file start jenkins) for more details. - Create a jenkins user to run this service.
-
Direct console log output to the file
/var/log/jenkins/jenkins.log. Check this file if you are troubleshooting Jenkins. -
Populate
/etc/default/jenkins(file cấu hình jenkins) with configuration parameters for the launch, e.gJENKINS_HOME - Set Jenkins to listen on port 8080. Access this port with your browser to start configuration.
If your
/etc/init.d/jenkins file fails to start
Jenkins, edit the /etc/default/jenkins to replace the
line ----HTTP_PORT=8080---- with
----HTTP_PORT=8081----. Here, "8081" was chosen but you
can put another port available.
-
Register the Jenkins service with the command:
sudo systemctl daemon-reload
-
Start the Jenkins service:
sudo systemctl start jenkins
Check status to verify that Jenkins started successfully
$ sudo systemctl status jenkins
If Jenkins is not running. Please start it:
$ sudo systemctl start jenkins
Opening the Firewall
By default, Jenkins runs on port 8080, so let’s open that port using ufw:
$ sudo ufw allow 8080
Check ufw’s status to confirm the new rules:
$ sudo ufw status
Notes: If the firewall is inactive, the following commands will allow OpenSSH and enable the firewall:
$ sudo ufw allow OpenSSH
$ sudo ufw enable
On CentOS 7 using yum
Install EPEL Repository
$ sudo yum install epel-release
$ sudo yum update
$ sudo reboot
Install Open JDK 8
$ sudo yum install java-1.8.0-openjdk.x86_64
Check jeva version:
$ java --version
Add Jenkins Repository and Install Jenkins
$ sudo wget -O /etc/yum.repos.d/jenkins.repo https://pkg.jenkins.io/redhat-stable/jenkins.repo
$ sudo rpm --import https://pkg.jenkins.io/redhat-stable/jenkins.io.key
$ yum install jenkins
Start Jenkins and configure it to run automatically when the server
starts
$ sudo systemctl start jenkins.service
$ sudo systemctl enable jenkins.service
Set Firewall to open port 8080 to access Jenkins from browser
$ sudo firewall-cmd --zone=public --permanent --add-port=8080/tcp
$ sudo firewall-cmd --reload
Using Docker
Add user to the docker group
$ sudo usermod -aG docker ${USER}
Use chmod to set read + write permission for /var/run/docker.sock
$ sudo chmod 666 /var/run/docker.sock
Install Jenkins container
We will pull the Jenkins docker image and run it by using the following
command:
$ mkdir -p /home/kenjinguyen/jenkins_home
$ cd /home/kenjinguyen
Check user ID and docker group:
$ id
Pull the Jenkins docker image and run it:
$ docker run -v /var/run/docker.sock:/var/run/docker.sock -v $(which docker):$(which docker) -v `pwd`/jenkins_home:/var/jenkins_home -p 8080:8080 --user 1001:483 --name jenkins-docker -d jenkins/jenkins:lts
Notes: Here, we are using few necessary parameters:
-
-p 8080:8080: Maps the Jenkins Web UI port of Docker container to Docker host. -
-p 50000:50000: Maps the Build Slaves port of Docker container to Docker host. -
--user 1001:483: 1001 - uid of kenjinguyen and 483 - docker group. This information will be retrieved using theidcommand. -
--name jenkins_docker: Name of the Jenkins docker container -
-v `pwd`/jenkins_home:/var/jenkins_home: Bind mount for storing Jenkins container data and configurations/var/jenkins_hometo host/home/kenjinguyen/jenkins_home. -
jenkins/jenkins:lts: The image used to create Jenkins docker container.
Check if the Jenkins container has started
$ docker ps
Start a stopped jenkins container:
$ docker start [container_name]
Accessing the Docker container
You could access your docker container (through a separate
terminal/command prompt window) with a
docker exec command like:
$ docker exec -it [container_name] bash
Ex: docker exec -it jenkins-docker bash
Accessing the Docker logs
There is a possibility you may need to access the Jenkins console
log, for instance, when Unlocking Jenkins as part of the
Post-installation setup wizard.
$ docker logs [container_name]
Using docker ps to get container_name
Install Docker Compose in Jenkins Container
The Jenkins image does not come with docker pre-installed, neither
the docker-compose. In order to install docker compose we need to run
the following commands inside the container:
$ docker exec -it -u root jenkins-docker bash
$ curl -L "https://github.com/docker/compose/releases/download/1.24.0/docker-compose-$(uname -s)-$(uname -m)" -o /usr/local/bin/docker-compose
$ chmod +x /usr/local/bin/docker-compose
Using Docker Compose
Create docker-compose configuration
$ cd ~
$ mkdir jenkins-config
$ cd jenkins-config
$ mkdir data
$ touch docker-compose.yml
Copy the following configuration to
docker-compose.yml and
save:
version: '2.0'
    services:
      jenkins:
        image: jenkins/jenkins:lts
        privileged: true
        user: root
        ports:
          - 8081:8080
        container_name: jenkins-docker-compose
        volumes:
          - ~/jenkins-config/data:/var/jenkins_home
          - /var/run/docker.sock:/var/run/docker.sock
          - /usr/bin/docker:/usr/bin/docker
-
~/jenkins-config/data: This volume will be used to persist all your data: configurations, plugins, pipelines, passwords, etc. -
/var/run/docker.sock:/var/run/docker.sockand/usr/bin/docker:/usr/bin/docker: these volumes allow you to use docker inside the Jenkins server (You can create docker containers inside a docker container).
Run Docker Compose
$ cd ~/jenkins-config
$ docker-compose up -d
==> Jenkins is running in localhost:8081.
View the generated administrator password to log in the first time.
$ docker exec jenkins cat /var/jenkins_home/secrets/initialAdminPassword
-
Now, you're ready to install plugins and start creating pipelines. If
you want to stop the Jenkins container you can do it with
docker-compose down. When you restart it all your configuration, users, plugins previously installed will persist there.
3. Configure Jenkins
- After downloading, installing and running Jenkins using one of the procedures above, the post-installation setup wizard begins.
- This setup wizard takes you through a few quick "one-off" steps to unlock Jenkins, customize it with plugins and create the first administrator user through which you can continue accessing Jenkins.
Unlock Jenkins
Browse to http://localhost:8080
Get Administrator password
$ sudo cat /var/lib/jenkins/secrets/initialAdminPassword
If you are running Jenkins in Docker using the official
jenkins/jenkins image you can use
sudo docker exec ${CONTAINER_ID or CONTAINER_NAME} cat
        /var/jenkins_home/secrets/initialAdminPassword
to print the password in the console without having to exec into the
container.
$ docker exec jenkins-docker cat /var/jenkins_home/secrets/initialAdminPassword
Copy the 32-character alphanumeric password from the terminal and paste
it into the
Administrator password field and click
Continue.
Customizing Jenkins with plugins
After unlocking Jenkins, the Customize Jenkins page appears. Here
you can install any number of useful plugins as part of your initial
setup.
Click one of the two options shown:
- Install suggested plugins - to install the recommended set of plugins, which are based on most common use cases.
- Select plugins to install - to choose which set of plugins to initially install. When you first access the plugin selection page, the suggested plugins are selected by default.
If you are not sure what plugins you need, choose
Install suggested plugins. You can install (or remove) additional
Jenkins plugins at a later point in time via the
Manage Jenkins
>
Manage Plugins
page in Jenkins.
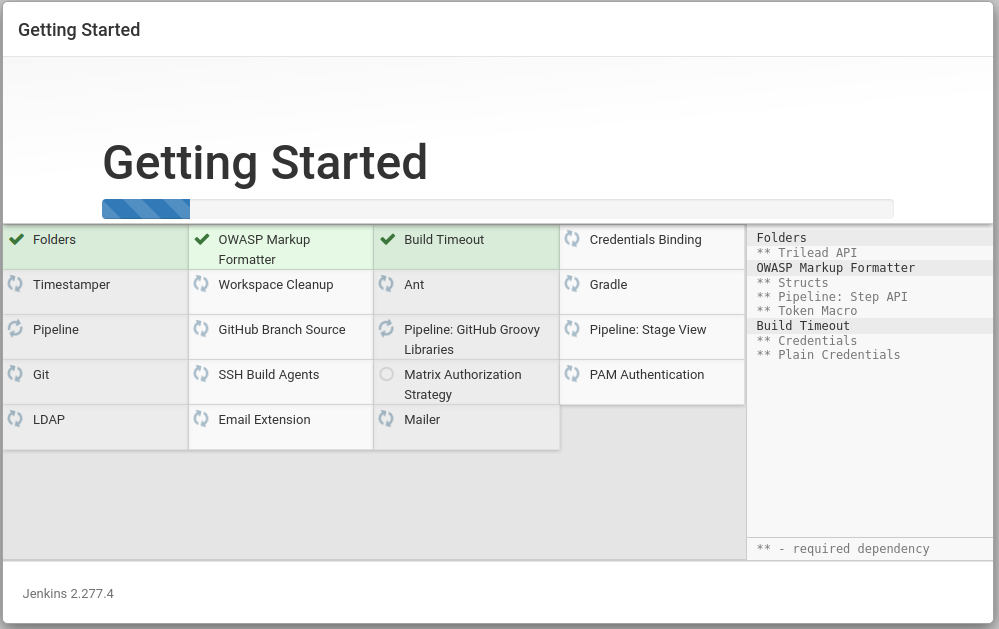
The setup wizard shows the progression of Jenkins being configured and your
chosen set of Jenkins plugins being installed. This process may take a few
minutes.
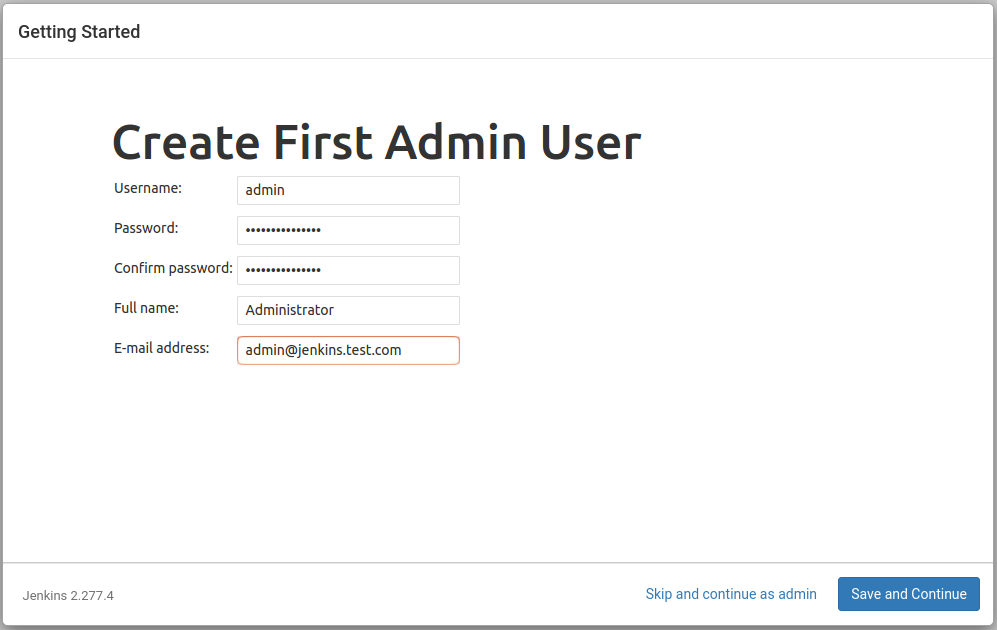
When the installation is complete, you will be prompted to set up the first
administrative user. It’s possible to skip this step and continue as admin
using the initial password we used above, but we’ll take a moment to create
the user. Let's enter the name and password for your user:
Notes:
The default Jenkins server is NOT encrypted, so the data submitted with
this form is not protected. When you’re ready to use this installation,
follow the guide
How to Configure Jenkins with SSL Using an Nginx Reverse Proxy on
Ubuntu 18.04. This will protect user credentials and information about builds that
are transmitted via the web interface.
Click Save and Continue. You will see an
Instance Configuration page that will ask you to confirm the preferred
URL for your Jenkins instance. Confirm either the domain name for your server
or your server’s IP address:
After confirming the appropriate information, click Save and Finish.
You will see a confirmation page confirming that “Jenkins is Ready!”:
Click Start using Jenkins to visit the main Jenkins dashboard:
At this point, you have completed a successful installation of Jenkins.


